
How to setup the Home Assistant MCP Server in Copilot Studio
How I brought my smart home into my AI workspace, and why you might want to try it too

What if you could control your smart home from the same AI assistant you use for work? Here’s how I connected Home Assistant to Copilot Studio using the Model Context Protocol.
I am a huge fan of Home Assistant. It’s an open-source home automation solution that’s extremely flexible and supports a huge range of protocols, vendors, and devices. Over the years I’ve built integrations and automations to make my home smarter, and I now manage more than 1,400 entities that either provide information about my house or give me the opportunity to control them.
Like most software nowadays, Home Assistant has integrations that enable AI interactions through text or voice. This is called Assist in Home Assistant. And thanks to @allenporter, Home Assistant rolled out its own MCP Server integration just two months after Anthropic released MCP in November 2024.
What is MCP?
The Model Context Protocol (MCP) is an open protocol that standardizes how applications provide context to LLMs. The Model Context Protocol Server integration in Home Assistant enables you to provide context for MCP LLM client applications. For example, you can control your lights from Claude Desktop and Copilot Studio, or expose your Google Tasks to-do list as a tool.
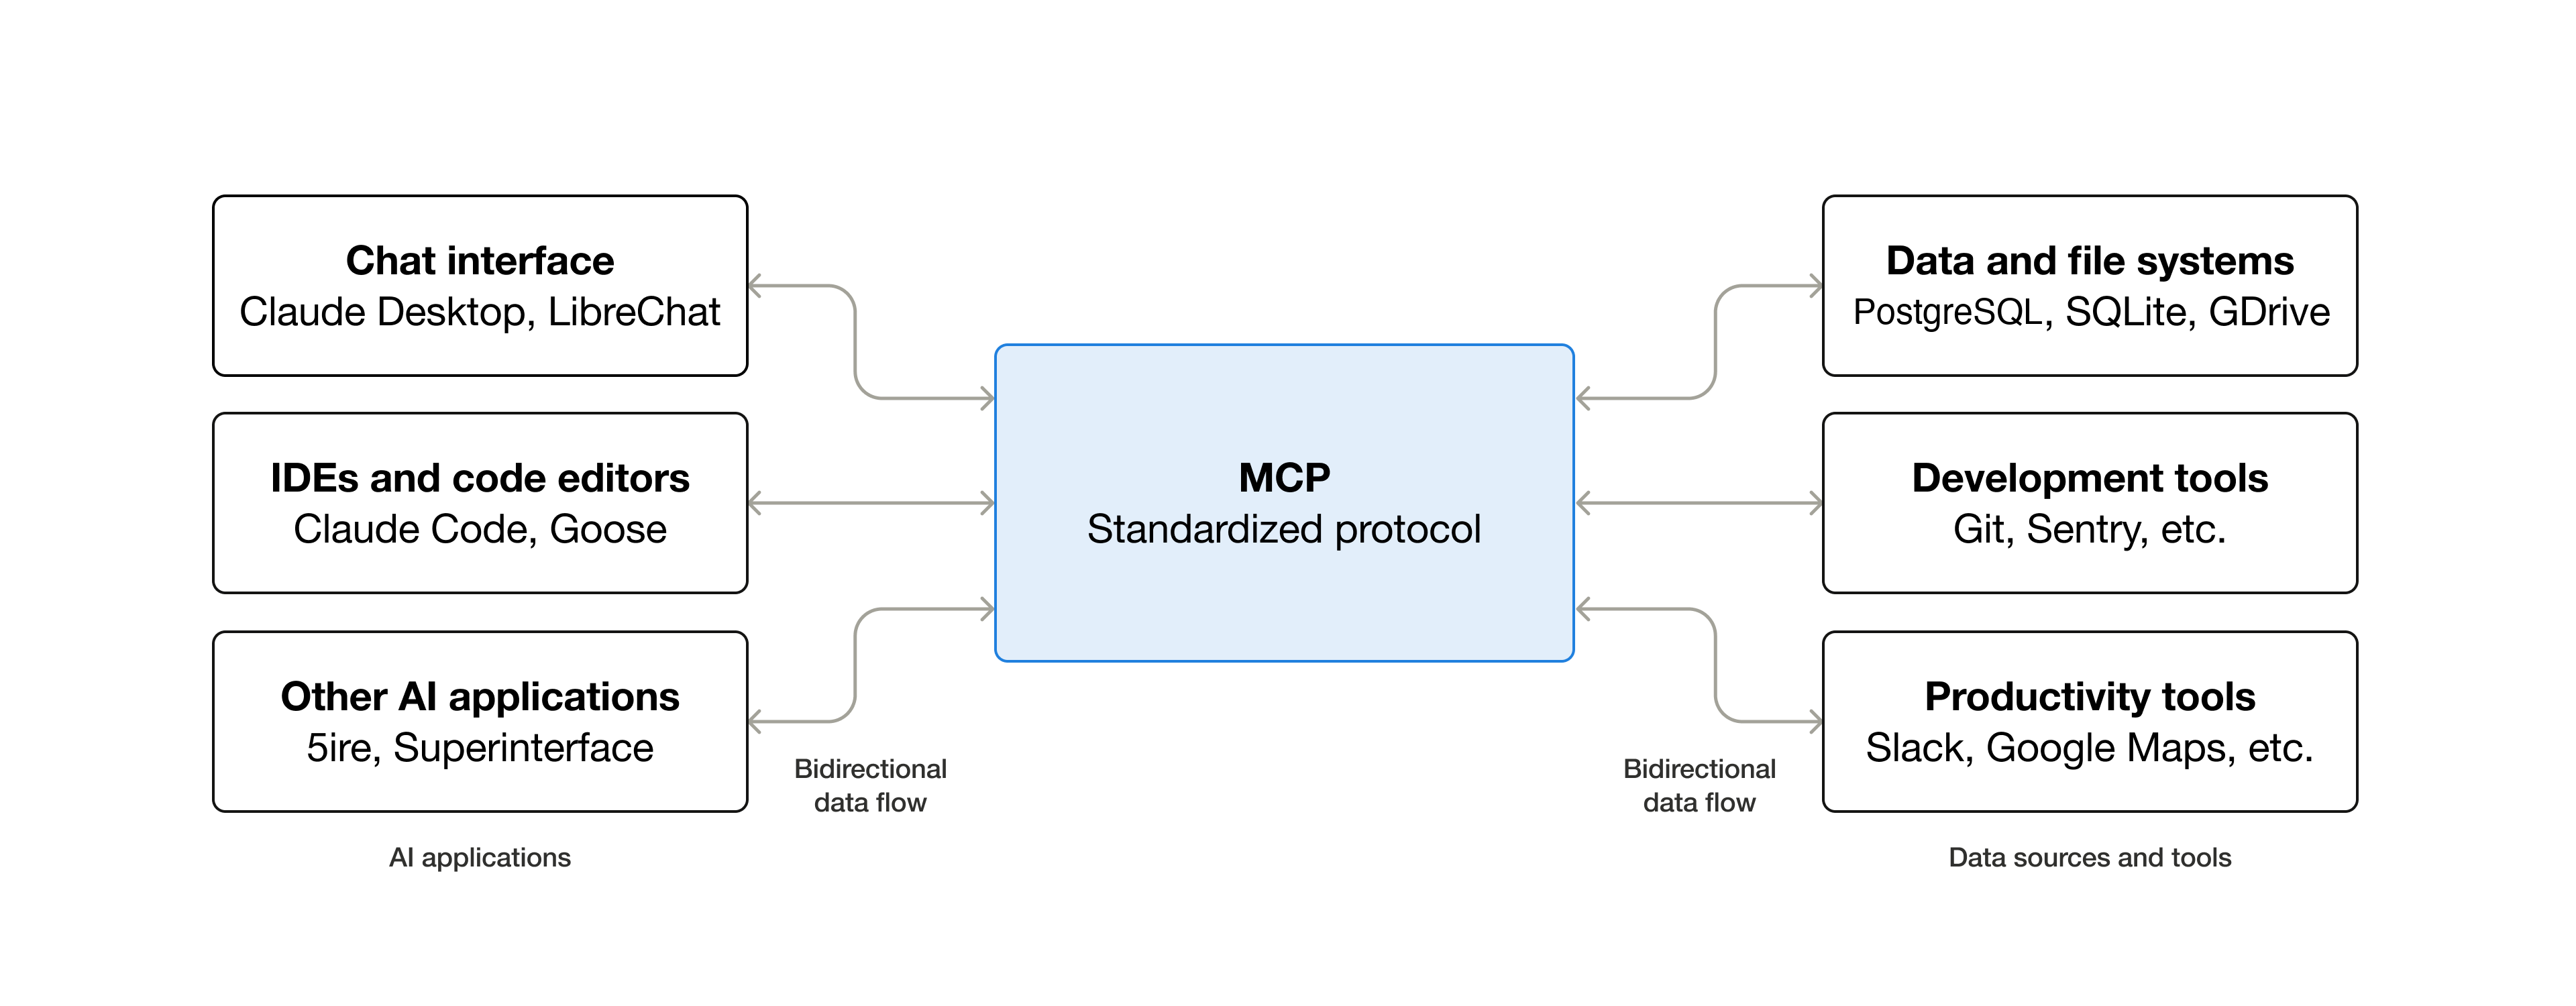
Controlling Home Assistant is done by providing MCP clients access to the Assist API of Home Assistant. You can control what devices and entities it can access from the exposed entities page.
Why would you use it in Copilot Studio?
You might be wondering why you’d want to control your home in a tool like Copilot Studio, which usually has business as its main purpose. Here are my reasons:
To learn about how Copilot Studio is working with MCP servers
To simulate agents that are used in factories for example, which give advise or take action based on the status of sensors
To inspire others about the possibilities of MCP, Copilot Studio, and Copilot Chat
To let me use information from Home Assistant through Copilot Chat which is my primary gateway to AI nowadays
Because we simply can 😊
So, let’s go!
Using a Home Assistant Long‑Lived Access Token
In Copilot Studio, you have three options for authentication: None (not recommended for security reasons), using an API key, or by using OAuth 2.0. While OAuth is probably the best option, setting it up manually requires quite some work. Dynamic discovery also fails because Copilot Studio expects OAuth metadata in the RFC discovery endpoints. Home Assistant’s MCP server uses OAuth via IndieAuth. However, it doesn’t expose all the MCP discovery endpoints Copilot Studio expects. A long-lived API access token is fine for my use case, so let’s start by creating one.
Create a long‑lived token in Home Assistant
In the Home Assistant UI, go to your profile. Click on Security (at the top of the page), and create a long-lived access token. Copy it immediately, because you won’t be able to retrieve it later.
Keep the token secure. You’ll paste it once into Copilot Studio.
Add the MCP server to your Copilot Studio agent
In Copilot Studio, go to the agent you want to be able to use the MCP server as a tool to get information about, and control, your Home Assistant instance.
Go to Tools, Add tool, click New tool, and select Model Context Protocol.

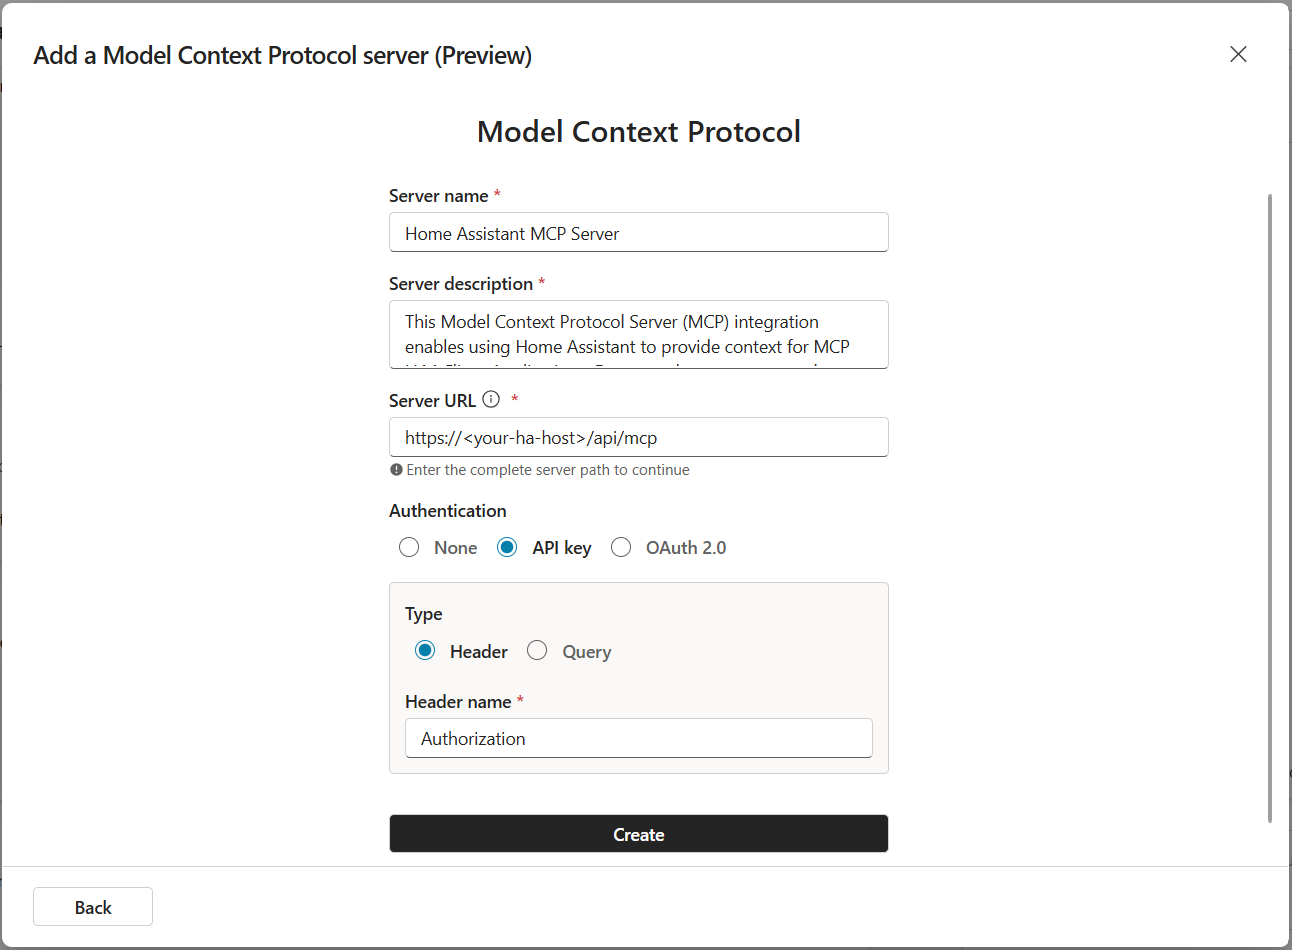
Create a server name e.g.,
Home Assistant MCP ServerExplain the capabilities in the server description. The agent orchestrator uses this to decide when to call the server.
Server URL.
https://<your-ha-host>/api/mcp.
Configure Authentication
Select API Key as authentication method. Make sure Header is selected as authentication type, and enter Authorization as the Header name. Click Create when you have entered the information.
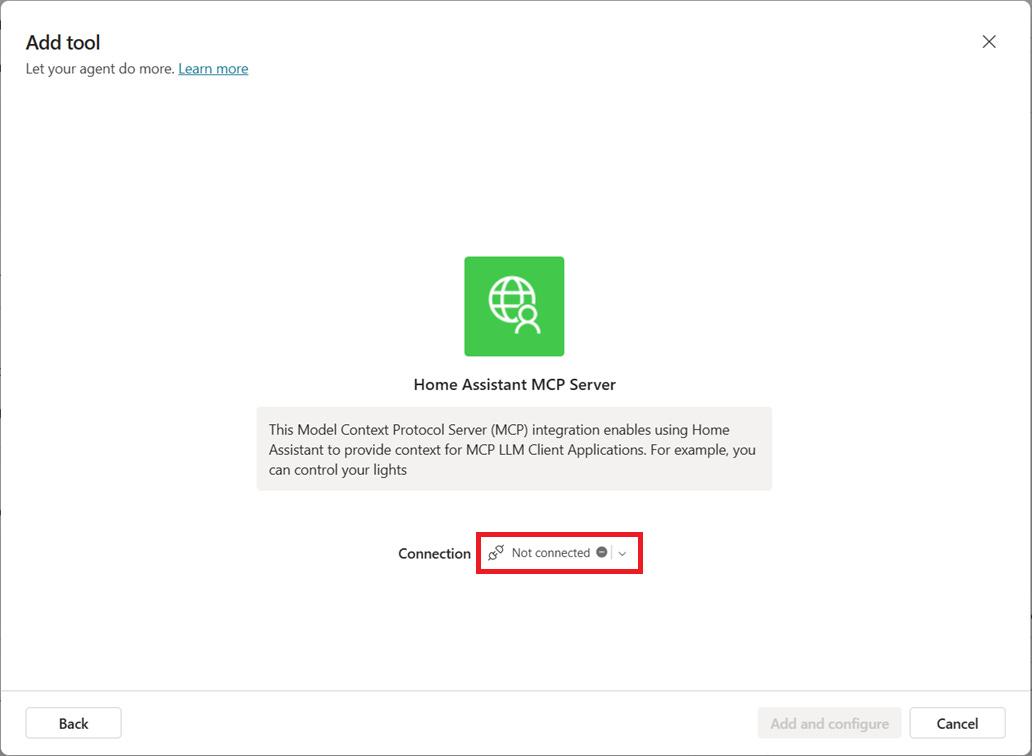
After the tool has been created, you’ll need to create a new connection. Click on Not connected and then click Create new connection.
The next interface looks incomplete at first glance. You’ll see information about the MCP server and there’s a field to enter information that’s apparently required (indicated by a red asterisk). It turns out that this is the field to enter your long-lived access token.
Copy your Long-Lived Access Token and prepend it with Bearer eyJhbGci...<etc>
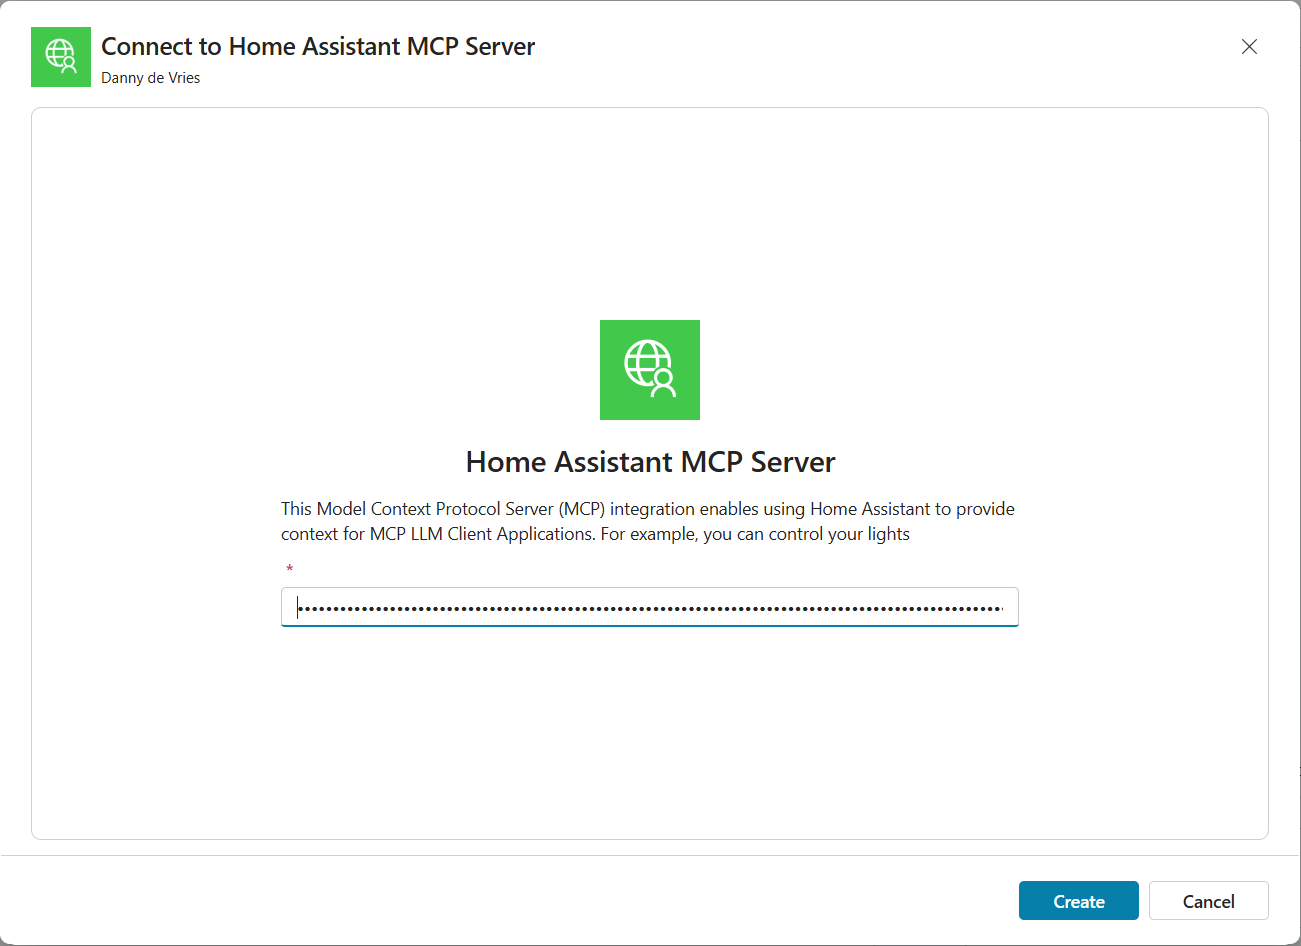
Click Create, and the Home Assistant MCP Server is displayed as connected. Click Add and configure.
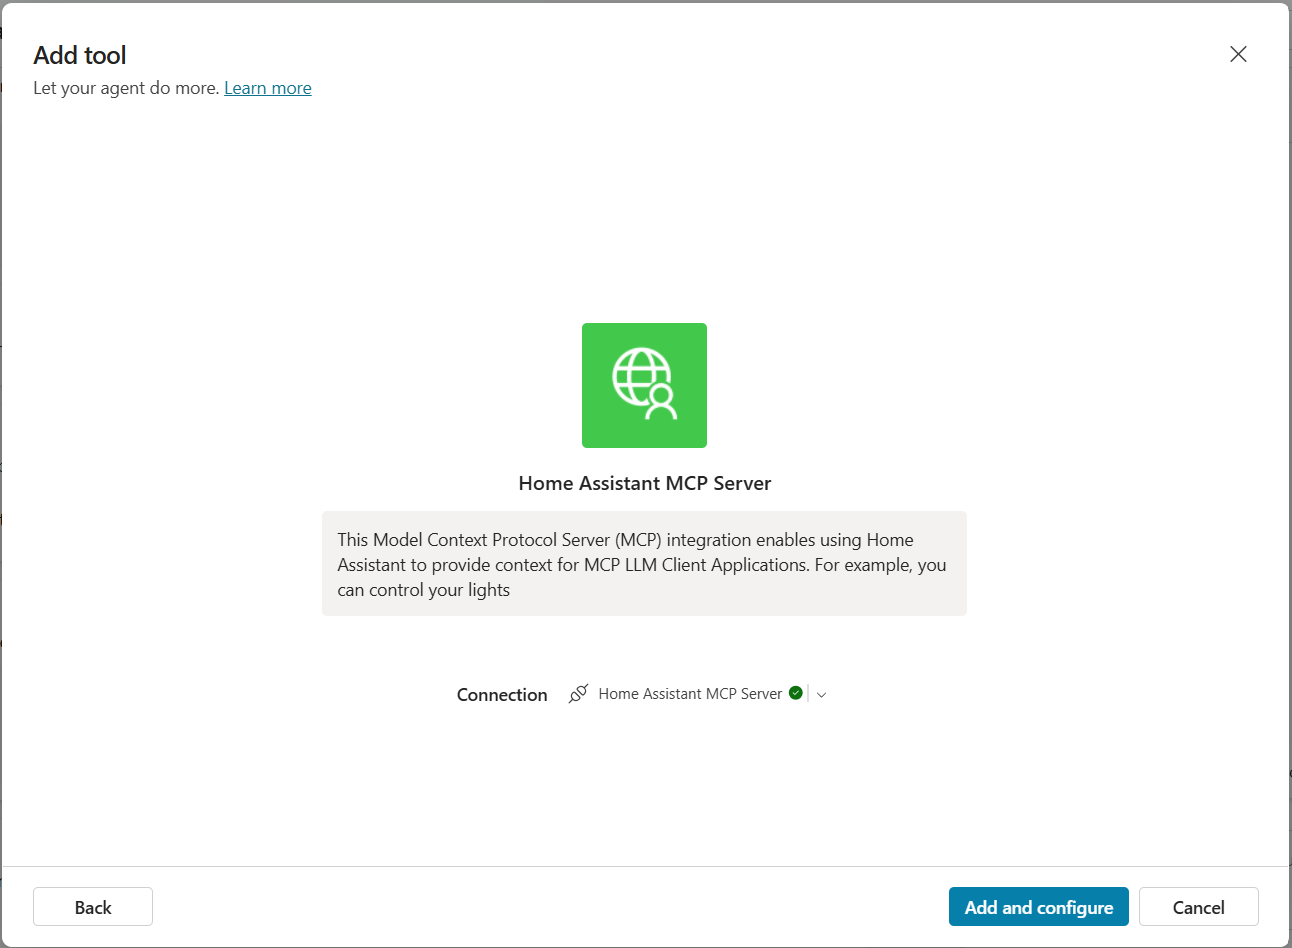
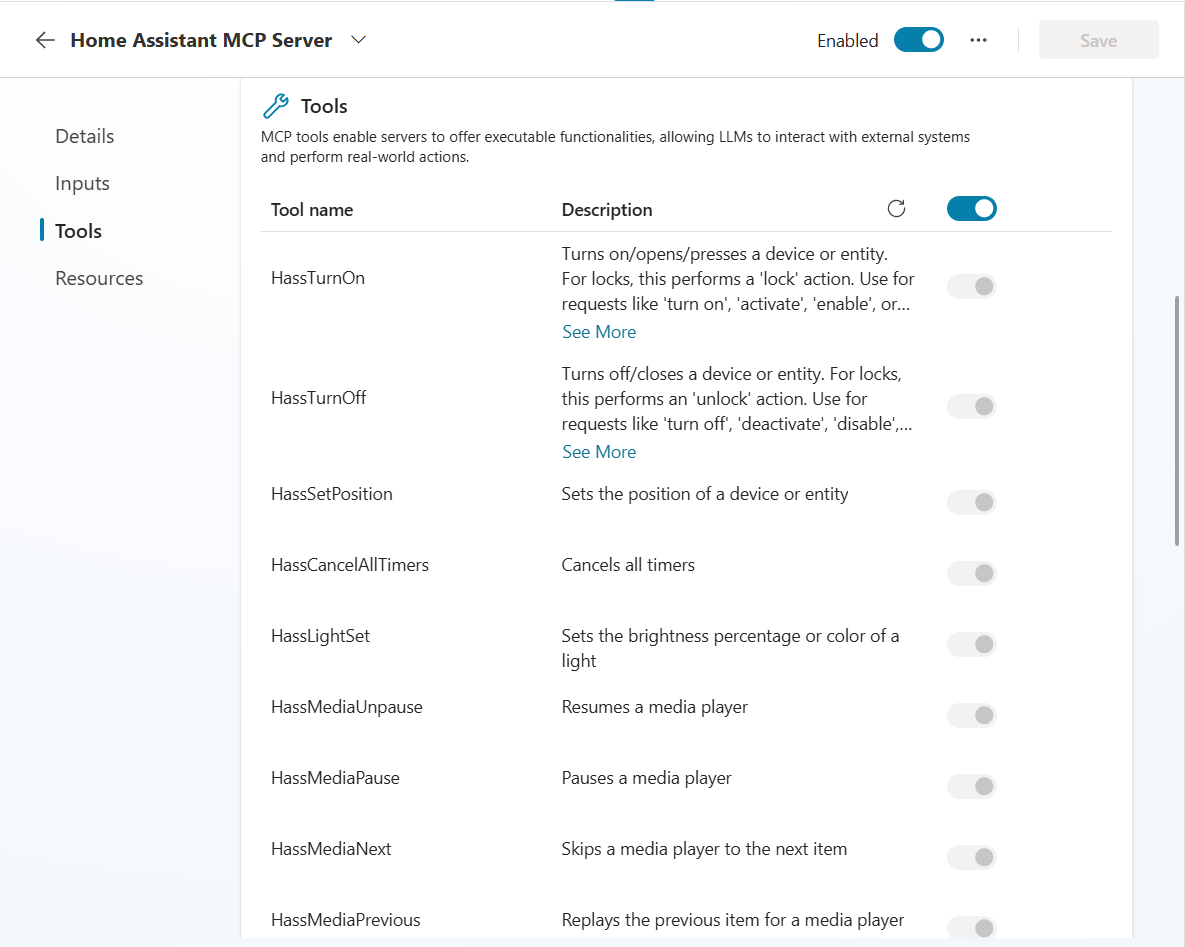
After the MCP server is added and configured, you’ll be able to see the tools the Home Assistant MCP server has to offer. It also gives you the opportunity to limit the tools based on your requirements and your target user group.
Testing the tool calling in Copilot Studio
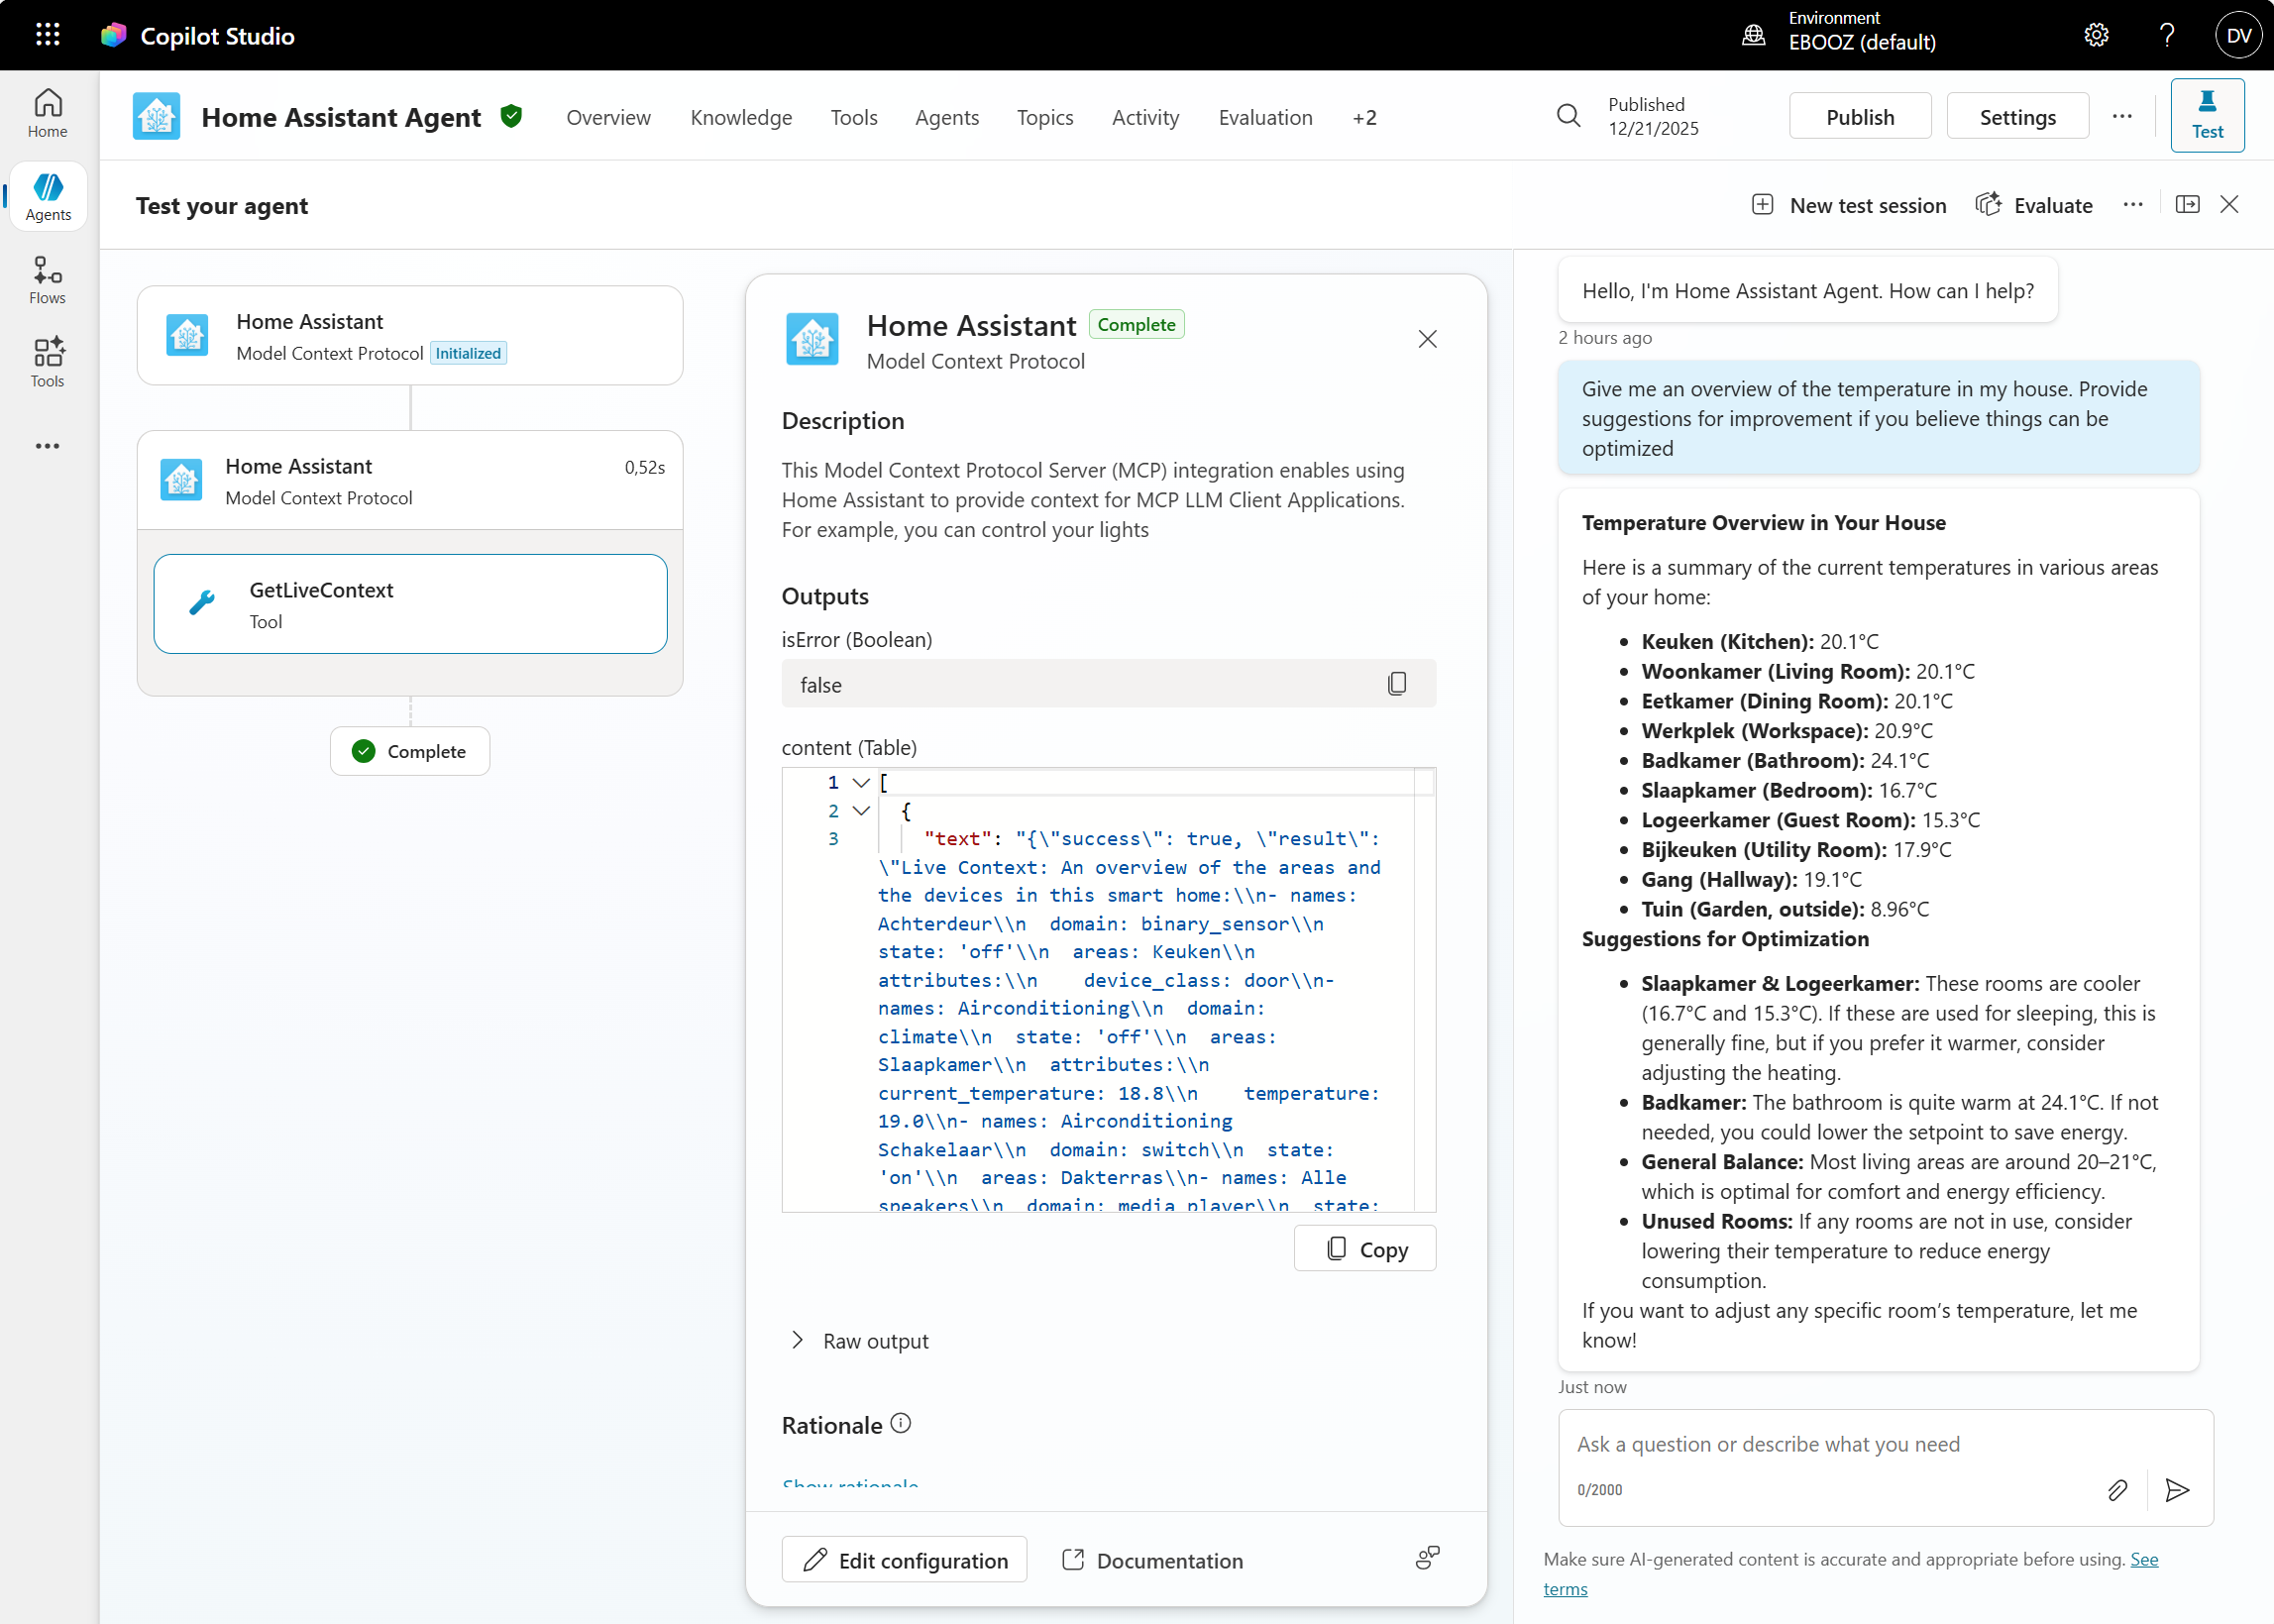
Let’s test if the agent in Copilot Studio can use the Home Assistant MCP Server as a tool based on the prompt you give the agent.
“Give me an overview of the temperature in my house. Provide suggestions for improvement if you believe things can be optimized”
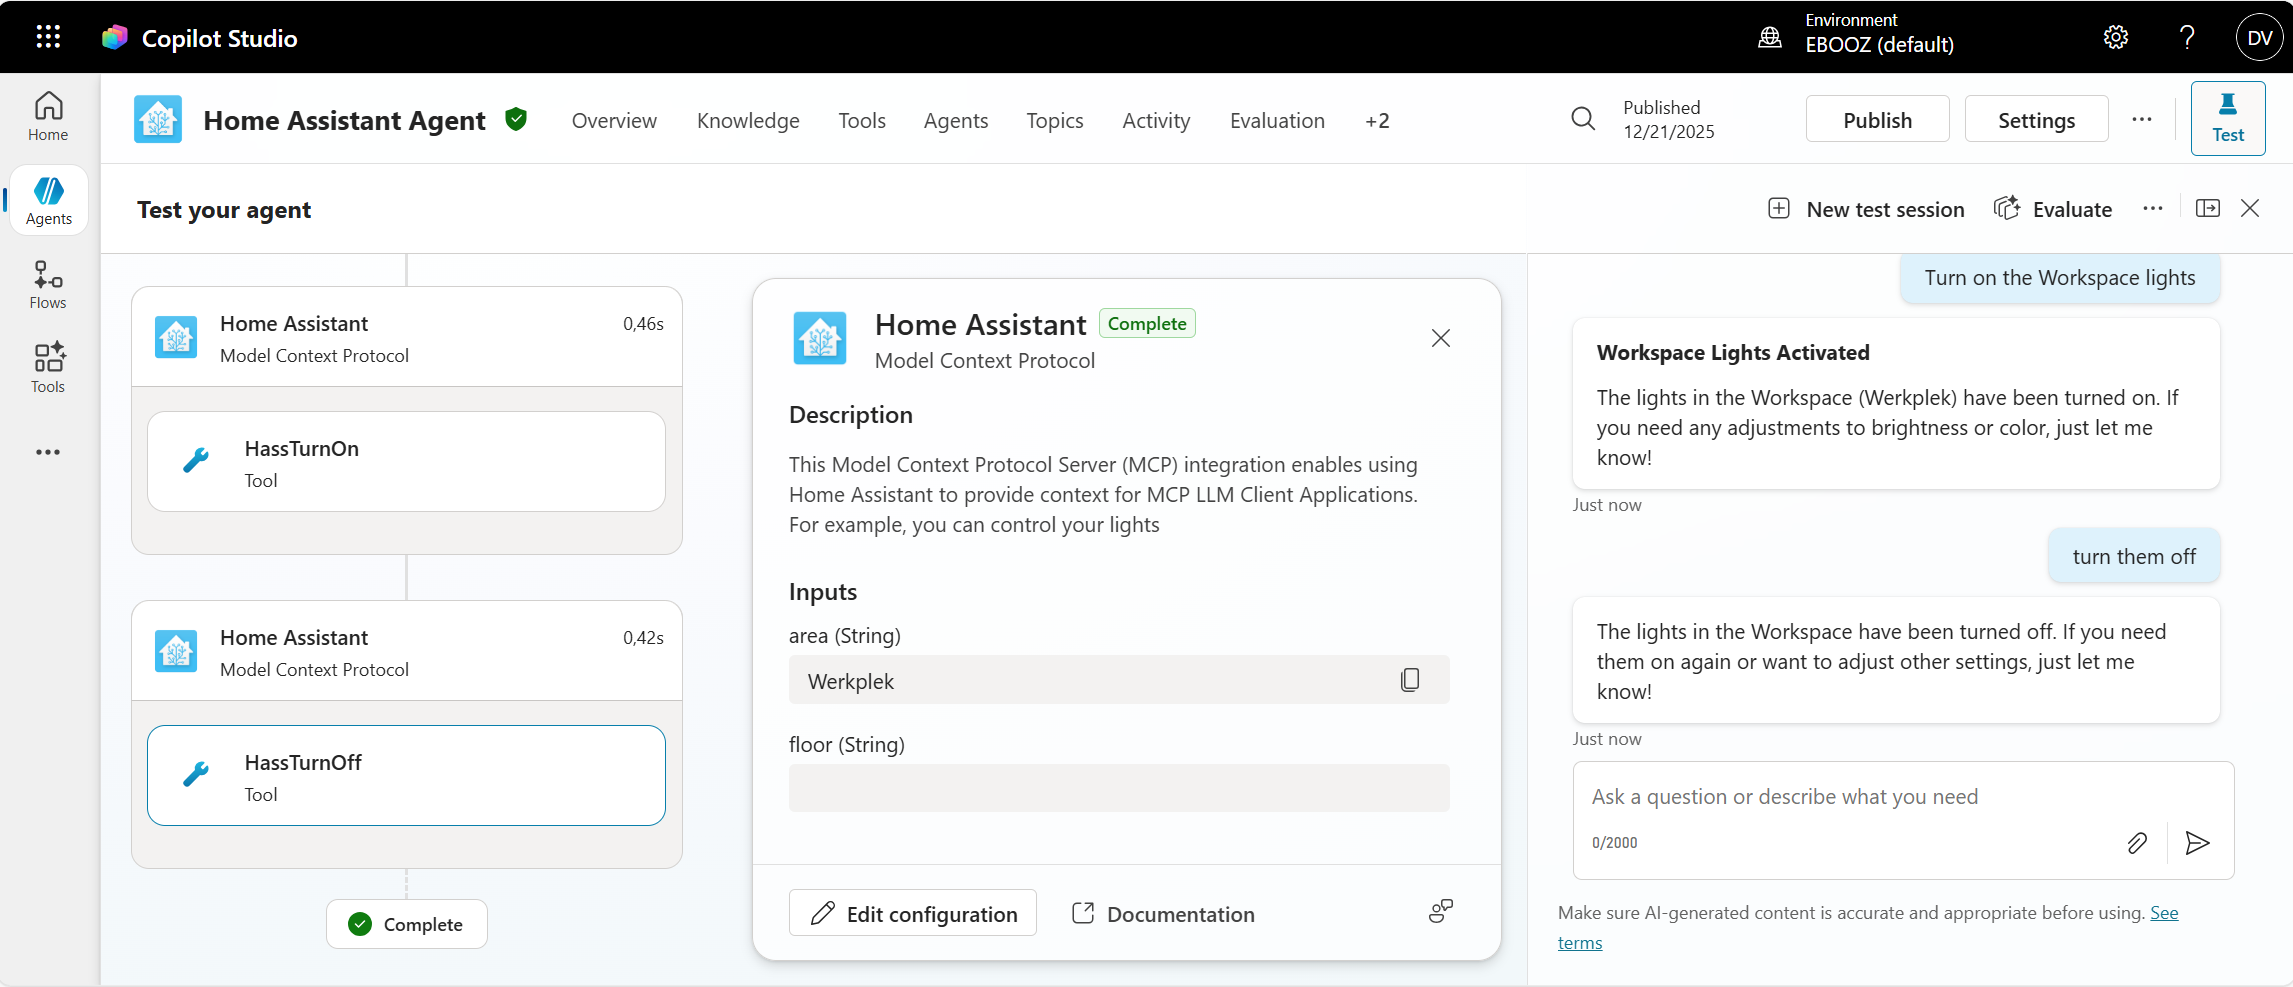
And let’s see if the agent can execute actions as well by asking:
“Turn on the Workspace lights”
Guiding your agent with the right instructions
Before I started to play around with Copilot Studio, I first wanted to test things locally. Since the option to use Claude for Desktop was documented properly, I signed up for a Claude Pro plan that enabled me to add a custom MCP server in Claude for Desktop. As a bonus, I also noticed that you get a default prompt for Home Assistant when you add the server to your chat in Claude for Desktop.
I updated the original default prompt in Claude for better readability in Copilot Studio, and improved certain instructions based on references and best practices that we use. They’re not final yet, but you can use these as a starting point.
1. Tool Usage
- Always use the designated intent tools for Home Assistant actions.
  * Use HassTurnOn to lock a lock.
  * Use HassTurnOff to unlock a lock.
- When controlling a device, provide only the device name and domain.
- When controlling an area, provide only the area name and domain.

2. Handling User Requests
- If the user requests to control all devices of a specific type, ask the user to specify an area unless there is only one device of that type.
- If the user asks about the existence or type of a device (e.g., “Do I have lights in the bedroom?”), answer using the static context provided.
- If the user asks about the current state, value, or mode of a device (e.g., “Is the lock locked?”, “What is the temperature outside?”):
   1. Recognize that this requires live data.
   2. Always call the GetLiveContext tool to retrieve real-time information.
   3. Use the tool’s response to answer the user accurately and directly.
   4. Do not include citations when responding with live data.

3. Language Handling
- Detect the language of the user’s query (English or Dutch).
- Respond in the same language as the user, using clear and natural phrasing.

4. Error Handling and Unsupported Actions
- If a requested action is not supported (e.g., starting timers), inform the user politely and suggest alternatives if possible.
- If a tool fails or data is unavailable, inform the user and provide guidance or next steps.

5. Security and Privacy
- Do not expose or reference sensitive information about the home or its occupants.
- Only provide information relevant to the user’s request.

6. General Knowledge
- For questions not related to the home, answer truthfully using internal knowledge.

7. Response Quality
- Ensure responses are concise, context-aware, and user-friendly.
- Ask clarifying questions if the user’s intent is ambiguous.
- Use formal, consistent terminology throughout.

8. Static Context
Reference the provided static context for device and area information as needed. Use this overview of the areas and the devices in this smart home:
- names: Backdoor
  domain: binary_sensor
  areas: Kitchen
- names: Airconditioning
  domain: climate
  areas: Bedroom
- names: Airconditioning Switch
  domain: switch
  areas: Bedroom
- names: All speakers
  domain: media_player
- names: Car Climatisation state
  domain: sensor
- names: Car engine Percent
  domain: sensor
- names: Average humidity upstairs
  domain: sensor
- names: Hoymiles Gateway solar produced
  domain: sensor
<etc.>
Key takeaways
Setting up Home Assistant with Copilot Studio via MCP takes a bit of configuration, but the result is powerful. You can query sensor data, control devices, and integrate your home automation into your daily AI workflow. Whether you’re experimenting with agent orchestration, building factory simulation scenarios, or just want to ask Copilot Chat to turn off your lights, MCP makes it possible.
What’s next?
I’m continuing to refine the agent instructions and exploring more advanced automations. I’m also curious to see how MCP support evolves in both Home Assistant and Copilot Studio. If you try this yourself, I’d love to hear what you build. Reach out and share your setup!